
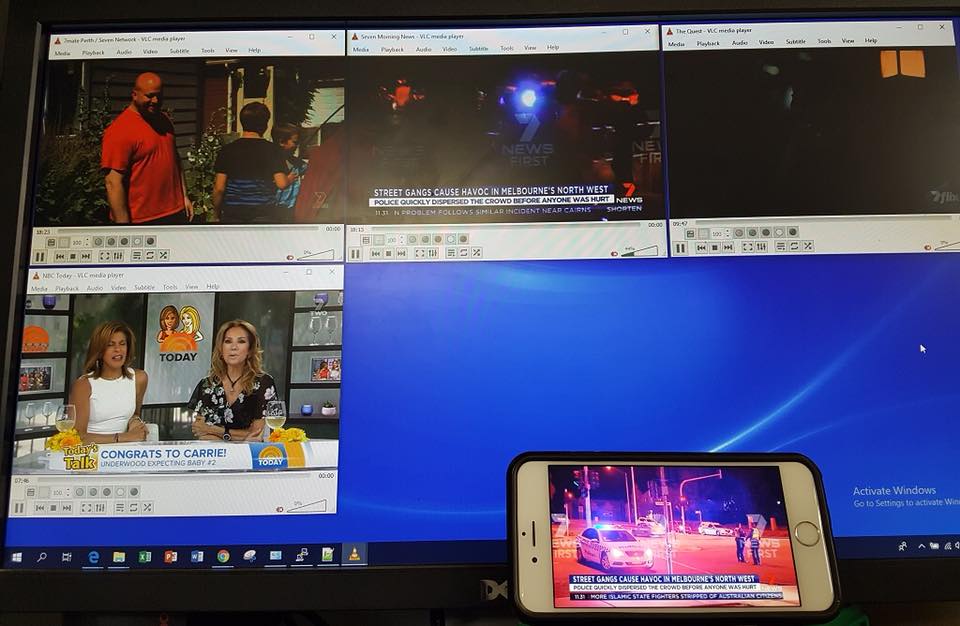
I have a projector out in the theatre room, however, this same room does not have any coax run for TV reception. Nor does the projector have a tuner for Digital TV. Thus the idea for the RPi TV streamer! I could have easily gone to the local tech shop and purchased a tuner and ran some coax, but I already have an android device hooked up to the projector, why not try and stream TV to it locally in the house. My own IPTV service of sorts.
I do want to give a bit of a shout out to CWNE88, (Go follow him if you get a chance!) This is the guy that got me started streaming TV via the Raspberry Pi, however he concentrates a lot on multicast streaming and to be honest, most of us do not have the infrastructure to handle multicast traffic on our LAN. So I had to find an alternative option that actually worked. (dvblast works great?if you have suitable switches/routers to handle multicast) Anyhow, during my research, I stumbled across TVheadend. I learned pretty quickly that it could be installed on a Raspberry Pi and be used to stream tv via HTSP. (Home TV Streaming Protocol) HTSP is a TCP based protocol and works in a unicast type fashion without killing your home network.
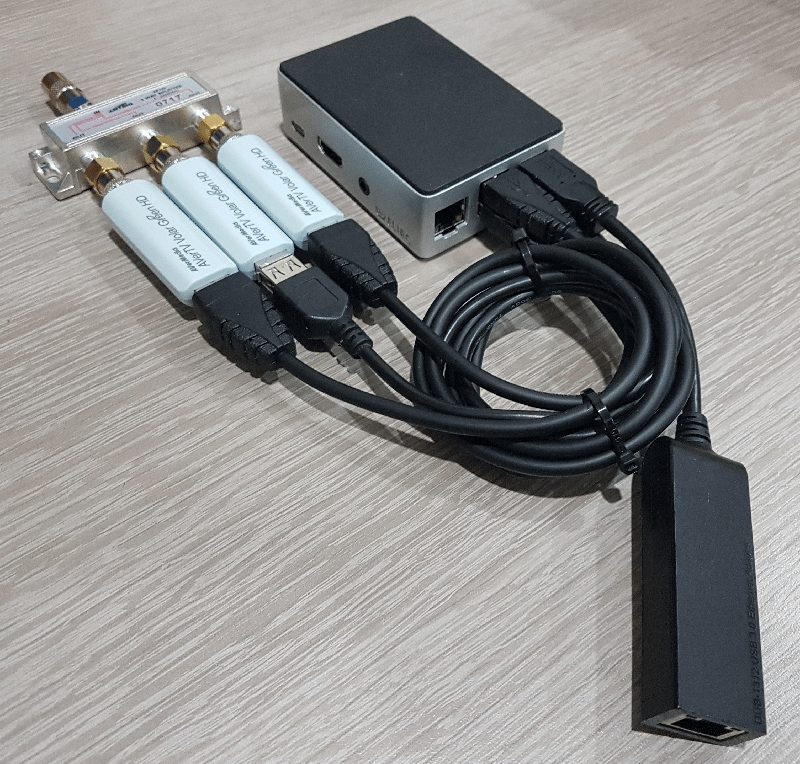
This is the hardware you will require:
- Raspberry Pi 3 B+ (This is what we tested with)
- USB Extension Cables
- Good quality 5v power supply for RPi
- USB TV Tuner (We used Avermedia Volar Green HD @ $29ea)
- Splitter (We used a 3-way splitter to really push the RPi3B+)
- F-type adapters
- USB to Ethernet Adapter (Optional)
Prerequisites
I am going to assume you know how to get Raspbian/Stretch Lite onto your Raspberry Pi. If not check out the Prerequisites of this post here. It will walk you through, downloading the image, using Etcher to put the image onto an SD card, setting up the RPi via Raspi-config, and enabling SSH. Once you have completed those steps, come back here and continue.
The end state of the Prerequisites is to have access to your Raspberry Pi via SSH and have the command line up and in front of you.
For those confident on the RPi
Step 1: Update/Upgrade the Raspberry Pi
First things first, you need to ensure your Raspbian repositories are up to date. Run the Following commands:
sudo apt-get update
sudo apt-get upgrade
After running the second command, select ‘Y’ and go get a coffee. This process can take 5-10 minutes depending on how old the initial image was.
Step 2: Install TVheadend server
Now that your Raspberry Pi is fully up to date, you need to run the following commands:
sudo apt-get install dirmngr
This command may not need to be run, however, for me, TVheadend would not install without it.
sudo apt-key adv --keyserver hkp://keyserver.ubuntu.com:80 --recv-keys 379CE192D401AB61
More info about installing the GPG keys can be found here.
echo "deb https://dl.bintray.com/mpmc/deb raspbianstretch stable-4.2" | sudo tee /etc/apt/sources.list.d/tvheadend.list
Again, more info on where to get the correct repo for the RPi is here.
Check and make sure the correct one is used. This can update at times.
sudo apt-get update
In a nutshell, we are telling ‘apt-get’ to grab any updates from the repository we added above. This will then allow us to install TVheadend because it now knows where to ‘grab’ it from.
sudo apt-get install tvheadend
Select ‘Y’ and allow TVheadend to install. If you tried to run this command without doing the steps above, you would run into errors
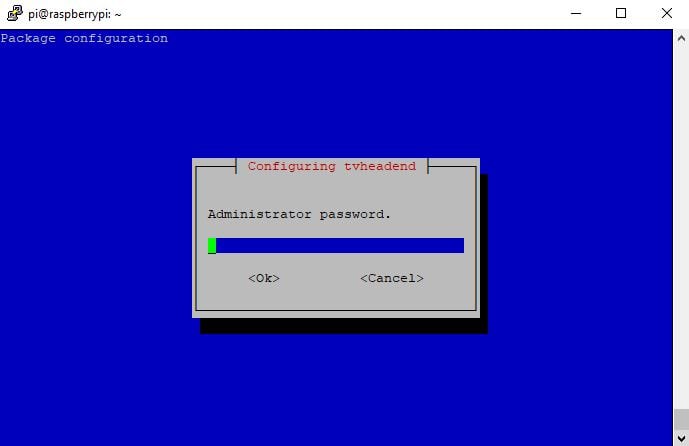
During the install, you will be asked to set an administrator username and password. (See Screenshots below!) Be sure to set this correctly and remember. You do not get two chances to enter the password. I learned this the hard way!
If for some reason, you did stuff up the username and password. Uninstall tvheadend with:
sudo apt-get purge tvheadendand
sudo apt-get autoremoveThen reinstall tvheadend again.
Step 3: Log into TVheadend
 Open up a web browser and enter the IP address of your Raspberry Pi. Also, use the port number ‘9981’. For example http://192.168.1.168:9981 (Your IP address for the RPi will be different.) Type
 ifconfig in the terminal screen to confirm RPi IP address.
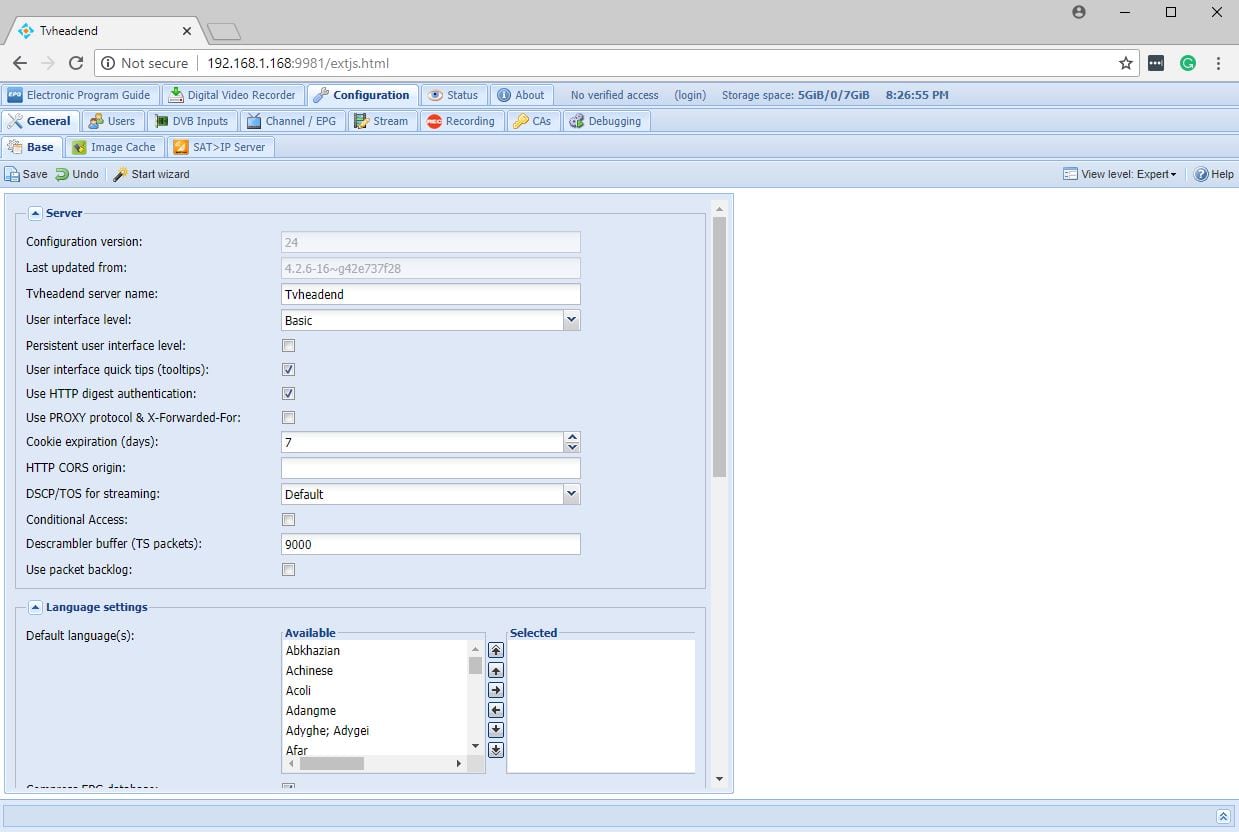 When you first open Tvheadend, you will get the Wizard which will step you through setting up the tv tuners. Hopefully, you left them plugged in from the start. If not, plug them in and restart the Raspberry Pi. Go back into the web browser and log back into TVheadend.
Step 4: Configure TVheadend for streaming
The configuration for TVheadend settings post is here.
I have no doubt, however, if you got this far, you will be able to bumble your way through the configuration. This was the easiest part. I then used VLC to watch the streams. You can get these links from inside Tvheadend.
Update: Apple/iOS App
If you want to consume some TV from your iOS device, I can confirm that the tvhclient app works a treat. No nonsense setup, easy channel browsing. It can be used in conjunction with the VLC app to stream video easily.
Hello,
First of all thanks for the top guide!
I’ve a problem with IPTV & TVHEADEND on a RASPBERRY.
Unfortunately I can see any of the channel in the m3u list.
I see all muxes, but no services.
I’ve tried with two different approach:
– Use directly the untouched m3u list, I can find 4000muxes and about 50 service
– Modify the m3u to use ffpmeg (with command: pipe:///usr/bin/ffmpeg -loglevel quiet -I http://xxxx -c copy -flags +global_header -strict -2 -f mpegts pipe:1)
I can find all the 4000muxes but 0 services! Also when I try to start a mux, VLC throw an error.
Is my commandline wrong?
thanks for any help 🙂
I’ll have a look tonight! What tuners are you using, and in what configuration? I really need to do a video/post of the TVheadend setup.
Thanks for the info. We are waiting for Step 4: Configure TVheadend for streaming 🙂
Is there a way to compress the signal you are sending out? I will like to stream over the internet.
Thanks for sharing
I stream it just nicely to my 4G mobile device, both via VPN or just your standard port forward. Give it a crack, port forward 9981 (*I think that’s the TVheadend port) then try access via your WAN IP and port number. It works well to my phone. If you go down the VPN route, then it is a bit hit and miss because of the encryption/decryption. As for compression, you can probably play with the output streams, but the HTSP protocol is not too bad, its made for streaming.
Some progress?
not yet!! Been too busy working on my DIY Powerwall. Promise I’ll have a TVheadend guide soon!
I have started a post for configuration of TVheadend here: How to configure TVheadend Server
Great post!
Just wondering why you used a USB to ethernet adaptor instead of the on-board ethernet?
Was there any advantage to doing this?
so yes, double-edged sword this one. The onboard ethernet is only 100mbit. The USB adapter is Gigabit…However, saying that the USB bus I believe can only handle so much. Having the 3 DVB-T adapters plus the USB to ethernet adapter may negate the speed advantage of using the USB to Ethernet adapter….I have not run any tests at this stage. I have tried both, and at this stage, the onboard ethernet port at 100mbit works just fine as well.
Perfect, I have some questions.
how to install oscam in it?
It is possible to compile vlc in it!
and it is possible to open the vlc on the raspberry itself,
Where was tvheadend installed?
Thank you.
My idea would be: tbs + raspberry + vlc
Here comes the doubt, how to open channels without oscam
It would be possible to activate channels with Tvheadend + oscam on it!
To watch TV, using vlc compilation for raspberry.
Thank you.
Hi Andrade, Sorry I do not have much experience with tbs and oscam, but rpi + vlc is certainly doable. However saying that, you can use the vlc program guide to flick between channels on the same frequency. It’s under “Tools” > “Program Guide” on the main menu. Also, are you saying you want to use the same RPi to view the content? so the Pi would have TVHeadend and vlc? I use Kodi on a Rpi to view the channels, maybe you could also run Tvheadend server on an instance of Kodi, but unsure. Possibly two Pi’s required.
I have not a clue about a single thing except VLC regarding this entire post. With that said this looks so cool I gotta go for it just to see what in the heck you have cookin here. One word. Wow
TIA
If you need a hand with anything let me know! Happy to help.
Are you streaming the full mux from each tuner to your network at the same time?
So any channel from those multiple muxes can be viewed?
It’s hard to find real world examples of people using tehe RPI for reliable full mux streaming.
I’m using PC hardware at present but want to do all 6 muxes for teh UK for all channels, essentially using the RPI as network tuners.
In my case, it’ll be one RPI zero and one tuner per mux, so total of 6 network tuners.
Each in a box with PoE support.
Hi John, yes each tuner essentially covers all channels on a single frequency. Having three or four tuners where I am allowed me to watch any channel on any frequency across multiple devices in my home. I use it for all kinds of streaming to my mobile device when out and about. Mostly cricket and sports that are only on free to air tv.
Hi Friend,
Can I use this method to stream iptv to external users? i.e. generate some m3u8 url (http://200.200.200.200/channel1.m3u8) ?
sure, generate the link using a VLC extension. (m3u) and distribute, you can then create the users in TVheadend server. They will be asked for credentials when opening the stream.
Hello
This tutorial is really nice, but I have found it very mysterious because of one reason, I have read many “how to’s” in Internet for RPi & TVHeadned but first time I see that someone is connecting 3x USB TV Tuners into one TV splitter, this approach is very interesting, can yo please explain to me in details why U are using 3x USB TV tuners and a splitter here ? What you achieve after this configuration ? Why are yo not using only one TV Tuner ? What benefit you have after connecting 3x TV USB ? This is really interesting what you did here, any advise would be appreciate, greetings from Poland !
Hi Mike, What happens is that multiple TV channels are broadcast/modulated on a single frequency. Having multiple tuners allows me to watch multiple channels at the one time. For example, I can be streaming Channel A from Broadcaster A onto an iPad, and also Channel B from Broadcaster B onto my TV in the lounge at the same time. With only one tuner, this would not be possible. Also if I VPN into my network and stream a channel, it’s not going to bother those at home watching TV. Greetings from Australia!!!!
Hi Dwayne, I have a RPi3 and TVuHat.
I’d like to monitor which TVstations are available, and when the signals drop out in my area.
Obviously I can just watch all the channels all the time, but I’d prefer some software to do it for me.
Do you know of anything existing that does this?
If not, I’ll write some python code to do it, but I cannot find any pointers to where I should look in tvheadend or elsewhere – my theory is that there would be some sort of way to monitor the streams to see if there is a live feed happening?
Hi David, Sorry I do not know of anything out of the box that could monitor this for you. In TVheadend under ‘status’, you can see the Signal To Noise (SNR) of a currently viewed channel. Maybe you could write a script to cycle through the frequencies/channels and monitor the SNR. Depending on the receiver, you should be able to see a threshold of SNR which shows a channel and what doesn’t. Saying that, how often is your signal dropping?
Thanks for the response. I will look into the SNR scanning.
Hi Dwayne, here’s the solution I found:
1 – create a channel.conf file in zap format, containing the channels/services I want to monitor
2 – for each of the services, run this command (in my case via python subprocess e.g.
tzap -c my_channels.conf -t 5 -x “ABC1”
3 – parse the subprocess.STDOUT to extract the data I want
(frequency, unixtime, FE_HAS_CARRIER, FE_HAS_SIGNAL, FE_HAS_SYNC, FE_HAS_VITERBI, FE_HAS_LOCK, video_pid, audio_pid, signal_strength, signal_to_noise, bit_error_rate, uncorrected_block_errors, FE_REINIT, FE_TIMEDOUT)
4 – save these values to a local SQLite database, so I can see the current status of all the channels, or follow the performance of a specific service over time.
I tried w_scan, dvbv5-scan, dvdb5-zap, dvbtune, but in the end tzap gave me the information required, and was the fastest. Needed to mess about with parsing, hex and binary conversions since it’s not totally human-friendly, but I’m happy with the result.
David, I think I understand 80% of that! So what I do know is that tzap is part of dvbutils and you’re using this to extract adapter status… Does this deserve its own blog post? hahaha, you don’t want to write for DO by any chance? 😉 On a serious note, what is the main problem this solves for you? Does your signal strength drop often? Are you setting it up to give you a graphical indication that its down?
Hi Dwayne,
Im using Astrometa DVB T2, problem is “dvb0-frontend1-not-found”, maybe you know what could be the problem?
Thread:
https://askubuntu.com/questions/1117748/astrometa-dvb-t2-linux-no-driver-warning-device-dvb0-frontend1-not-found
Hi George, I cannot remember the exact process, but from what I remember you can grab the driver and put it on the Pi. https://www.linuxtv.org/wiki/index.php/Astrometa_DVB-T2 This website lists the Realtek driver as being compatible. Maybe see if you can get a copy of it and install manually on the Pi. Also check this thread out for similar issues, maybe they have a fix: https://tvheadend.org/boards/4/topics/32993
Hi, nice work really, i got a single question.
With this setup (3 Tuners) how many concurrent users can watch different channels?
So my home i have 6 TV’s can i have the 6 Tv watching 6 different channels with just 3 Tv tuners?
Thanks in advance for the help
Hi Federico, Each tuner can handle all the channels on the frequency it is using at the time. For example, Channel 71, 72 and 70 in Australia all use the same frequency. If a user is viewing ch 71, and another user is viewing ch 72, then only the one physical tuner is being used. However is a user is viewing ch 91, and another user is viewing ch 71, then two physical tuners are being used. (91 and 71 are on different frequencies.)
I have 3 tuners to cover the big tv stations in Australia. (7, 9 and 10). However, I really should add one or two more tuners to cover the smaller stations just in case. I hope that makes sense.
So in this case, whit the physical tuner over the same frequency, you can stream for unlimited devices?
for example, can 40 devices see the channel 71 whitout problem?
ty sir )
HI Dwayne,
I exhume a very old post but I wanted to install Tvheadend on my raspi 3 and it seems that raspbian stretch is no longer usable ; I get that error
“Err:3 http://raspbian.raspberrypi.org/raspbian stretch Release
404 Not Found [IP : 2a00:1098:0:80:1000:75:0:3 80]”
when trying apt-get update.
Would you know a link to some tvheadend howto uptodate?
Thank you
Have you tried compile from source on possibly a newer version?
https://tvheadend.org/projects/tvheadend/wiki/AptRepositories#Ubuntu-LTS
Without really looking into it, I dont have much of a clue, on a brighter note though, my install is still running sweet!
Good luck!
Hi Dwayne, as far as you know is it possible to transcode to h264 with raspberry? Thank you